

I changed the permalink structure on a client site once and broke about forty URLs in one click. Google still had the old ones. Visitors were landing on 404 pages for a week before anyone told me.
That is the problem redirects solve, and in this post you will learn how to use the Redirection plugin in WordPress to fix it properly. You will learn how to create your first 301 redirect, how to catch 404 errors and fix them from the same screen, and how to let the plugin create redirects for you automatically when a URL changes.
Quick note on the plugin, because this matters in 2026. Redirection is still free, still actively updated, and there is no premium version waiting behind a paywall. Version 5.10.0 landed at the end of August 2026 and it needs WordPress 6.7 or higher and PHP 7.4 or higher. You can check the current numbers yourself on the plugin page at WordPress.org.
One warning before you start. Do not redirect every broken URL to your homepage. Google treats those as soft 404s, and your visitor lands somewhere with no relation to what they clicked. Send each old URL to the closest matching page, and if nothing matches, let it 404.
Step 1: Install Redirection and finish the setup
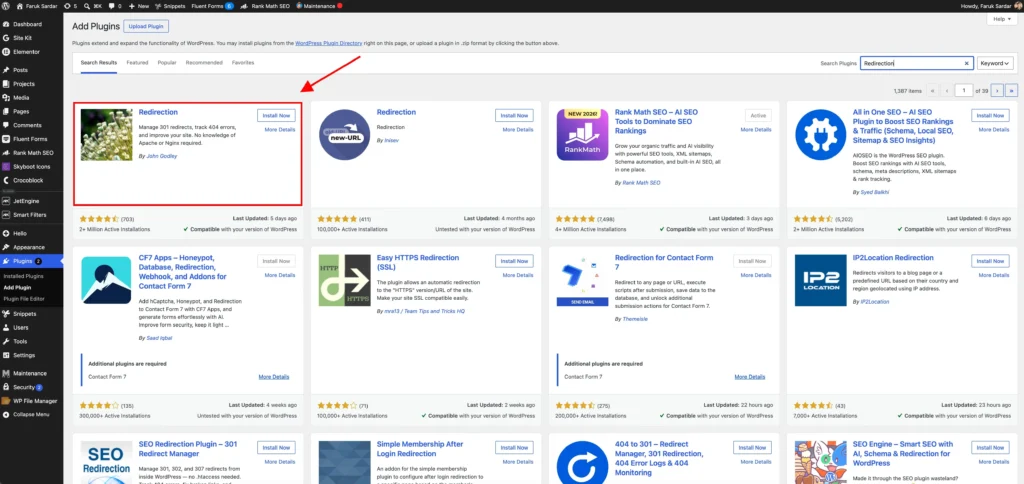
Install it the normal way.
For example, you can see:
- Go to Plugins, then Add New.
- Search for Redirection by John Godley.
- Click Install Now, then Activate.
- Go to Tools, then Redirection.
The first time you open it, a short setup screen appears with two options worth thinking about.
The first is monitoring permalink changes. Turn this on. It is the single most useful thing in the plugin, and I will come back to it in step 5.
The second is logging. The plugin can log every redirect and every 404, which is great while you are cleaning up a site, and less great as a permanent setting on a busy site because those tables keep growing. Turn it on now, then set an expiry later in step 6.
After setup, the plugin lives at Tools, then Redirection, with a row of tabs across the top: Redirects, Groups, Site, Import/Export, Logs, 404s, Options, and Support.
Step 2: Create your first 301 redirect
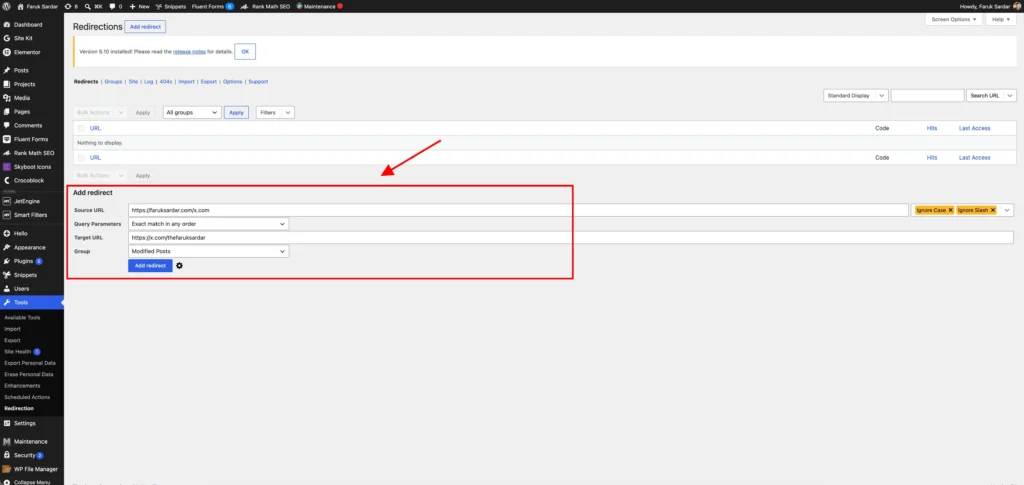
Open the Redirects tab and use the “Add new redirection” form.
For example, you can see:
- Source URL: the old path, like
/old-services-page - Target URL: where it should go, like
/services - Click Add Redirect
The source is relative to your domain, so you type /old-services-page and not the full address with https on the front. The target can be relative or a full URL if you are sending traffic to another site.
By default this creates a 301, which means permanent. That is what you want when a page has moved for good, because a 301 passes the ranking signals along to the new URL. Use a 302 only when the change is temporary, like a page you are rebuilding this week.
To change the code, click the cog icon at the bottom of the form. That opens the advanced options where you can set a title, pick the HTTP code, choose a group, and set the position, which controls the order redirects are processed in. The official docs cover the full form on the create and manage redirects page.
Test it in a private browser window. Browsers cache 301s hard, so a normal tab may keep showing you the old result even after you fixed it.
Step 3: Fix 404 errors from the 404s tab
This is my favorite part of the plugin and the reason I keep installing it.
Open the 404s tab and you will see every URL someone requested that did not exist. Real requests from real visitors and bots. Instead of guessing which URLs are broken, you get a list.
For example, you can see:
- Hover over a logged 404 and click Add Redirect.
- The source URL is filled in for you.
- Type the target URL and save.
You can also group the list to see which URLs are getting hit repeatedly, and redirect several at once with the bulk actions. Ignore the noise. A lot of what shows up in that log is bots poking at login paths that never existed on your site, and those do not need redirects. Focus on the ones with real hit counts and real referrers. The 404 tracking docs explain the filtering options.
Step 4: Let the plugin create redirects automatically
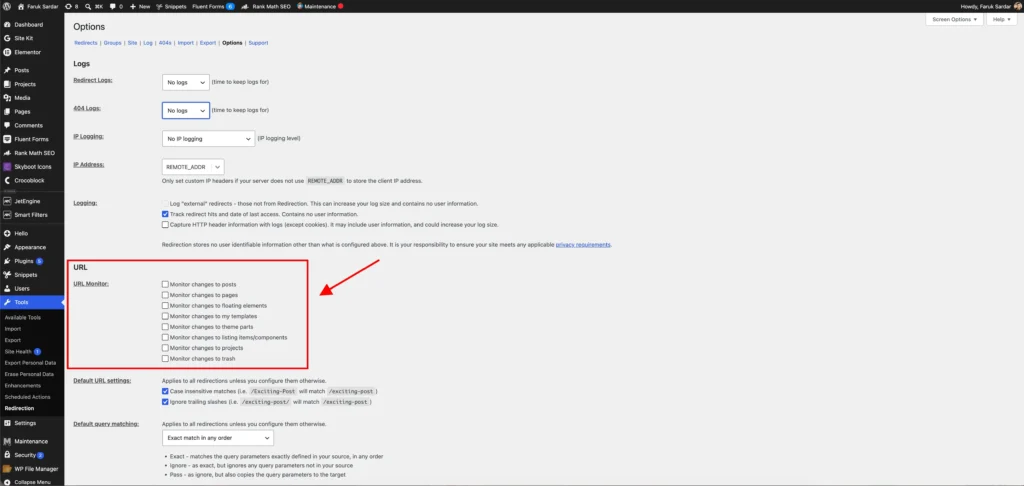
Open the Options tab and look for URL monitoring. This is what saves you from the mistake I opened this post with.
Pick the post types you want monitored, usually posts and pages, and choose the group the new redirects should land in. From then on, every time you edit a slug on a monitored post type, Redirection writes the redirect for you before the old URL can break.
You can also monitor deleted posts. Those get created as disabled redirects, so you go in, fill the target, and enable them. That is by design, since the plugin cannot guess where a deleted page should point.
Step 5: Redirect a whole section with a regex
Say you moved everything from /blog/ to /articles/. You do not want to write one redirect per post.
Source URL:  ^/blog/(.*)$
Target URL:  /articles/$1
Enable the regex option for that redirect, either in the source URL settings or the advanced panel. What is happening here: the ^ and $ anchor the pattern to the start and end of the path, (.*) captures whatever follows /blog/, and $1 drops that captured piece into the target. So /blog/my-post lands on /articles/my-post.
Two things to watch. A stray . or ? in a regex means something special, so escape it as \. or \? when you want the literal character. And test one URL before you save a pattern that touches hundreds of them. The regex docs have more patterns worth copying.
Step 6: Set a log expiry so the tables stay small
Back on the Options tab, set the log expiry for both redirect logs and 404 logs. A week or a month is plenty for most sites. Forever is how you end up with a database table full of bot traffic from two years ago.
The same page lets you anonymize or disable IP logging, which is worth setting correctly if your visitors are in a region with strict privacy rules. Everything on that screen is documented on the options page.
Step 7: Export before you migrate
The Import/Export tab reads and writes CSV and JSON, and it can export your rules as Apache .htaccess directives or Nginx rewrite rules. It also imports from other redirect plugins, so if you are switching from Yoast, Rank Math, Safe Redirect Manager, or Simple 301 Redirects, your existing rules come across.
I export a JSON copy before any migration. Redirects are the easiest thing to forget during a move and the most expensive to lose.
Other ways to redirect a URL in WordPress
Redirection is not the only option, so here is when I would reach for something else.
1. Server level rules. Editing .htaccess or an Nginx config is the fastest way to run a redirect, because the request never reaches PHP. It is the right call for site wide rules and huge lists. It is also the easiest way to take a site down at 2am with one typo.
# .htaccess, Apache only
Redirect 301 /old-services-page /services2. Your SEO plugin. Rank Math and Yoast Premium both ship a redirect manager. If you already run one, use it and skip the extra plugin. Two redirect tools on one site is how you create loops.
3. Hosting panel rules. Some hosts have their own redirect screen. Fine for a handful of rules, painful to audit later.
Which one do I use?
For a normal WordPress site, Redirection. It is free with no upsell, it has over two million active installs, and the 404 log plus automatic permalink monitoring covers the two things people actually forget to do. I only move rules into the server config when a site has thousands of them or when a redirect needs to run before WordPress boots.
Whatever you pick, keep the chains short. If /a points to /b and /b points to /c, fix /a to point at /c directly. Every extra hop is another round trip for the visitor.
Wrapping up
That is how to use the Redirection plugin in WordPress, from the first 301 to regex patterns and automatic monitoring. Set it up once on a site and it quietly stops the slow leak of traffic that happens every time a URL changes.
These steps match Redirection 5.10 and current WordPress, and the plugin has been maintained for well over a decade, so this workflow should still hold up on your install. The full official documentation lives at redirection.me if you want to go deeper on matching rules and dynamic targets.
Thanks for reading. If a redirect is behaving strangely on your site, drop a comment with the source and target and I will take a look. More WordPress and web development walkthroughs are on my blog.